Almost as difficult as deciding what to wear in family photos, figuring out where to go for pictures and how to position the subjects can provide quite a challenge. In this day and age of digital photography and relatively affordable SLR cameras, it really isn’t necessary to hire a professional photographer to get your family photo. Many of us have adequate camera equipment, and it just takes a little bit of know-how and patience to get a great “amateur” family photo.
Tips for Staging Family Photos

1. Choose a time of day when people are cooperative and likely to get a decent picture.
We threw together that photo of us up there before church one Sunday morning, and we were fortunate that everyone cooperated. Normally it’s not a good idea to attempt a family photo shoot when you’re in a rush. On the plus side, though, because it was morning, everyone was fresh and relatively happy. (The younger the children are, the more time you need to allow for the photo shoot. You don’t want to be rushed and stressed.) Also, morning light is more flattering than mid-day sun, so I wanted to take advantage of that.
Which brings me to point #2.
2. Use natural light if you can.
Natural light is most flattering, so if you can’t be outside, place yourself near a window with light coming in. Try not to use the flash; unless you have a good one (see the post my camera equipment).
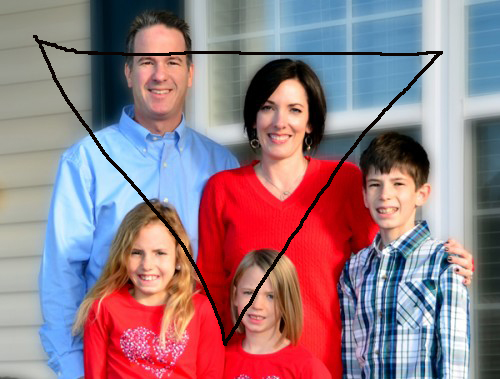
3. If you have more than 2 people in the photo, try to arrange yourselves in a triangle or V-formation.
This is a tip I learned from Dottie Foley, and we tried to apply that here, but the girls should have been moved over to the right just a bit so they off-set the ones of us in the back. If we’d had more time, I might have shifted them a bit and tried again. But you get the gist.
See how a professional photographer had us arranged with this strategy in mind.
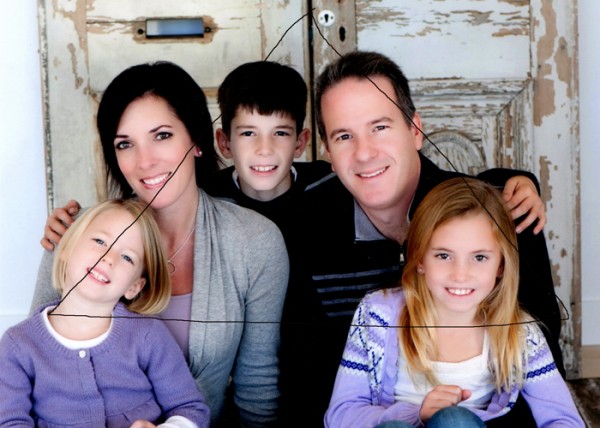
You get the idea, right?
4. Pay attention to the background.
Take a minute to clean up the background. This is particularly important when you are taking photos indoors, but it can also be pertinent when you’re outside. You don’t want someone walking right through the background of your picture.
Like this one! It COULD have been such a great photo. Sigh…
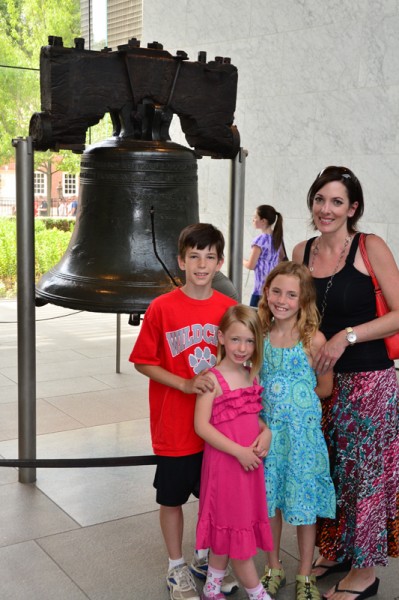
It’s also a good idea, before everyone disassembles, to look back over the photos you’ve taken (don’t you love the digital age!?) and make sure there is nothing there that you didn’t notice when you scanned your living room. A laundry basket in the corner, a lone discarded sock under the couch… those things really detract from the subject of the photo — your gorgeous kids, of course!
5. Crop in close.
Often the best photos are the ones that crop right in on the faces.

After all, it is the faces, not the outfits that really matter. See #4 in What To Wear (above).
I’d love to hear from you. If you have a great family photo taking tip that I missed, chime in! I’d also love to hear about creative things you’ve done with photos. I’m always impressed by family photos that are creative and fun.





3 Responses
Great tips! This just reminds me that I need to get a tripod so I can take our own photos! 🙂
Good tips! Especially about the lighting. Right after sunrise along with right before sunset are the best times to do outdoor shots.
In addition to watching what is in the background, also be sure any architectural elements or the horizon are straight. An otherwise great shot will just seem “off” if those are out of line.
I am lucky that my DH is a professional photographer, so I rarely have to do the big “family photo” myself.
Your photo above that has the girl in the background could easily be fixed by cloning the background and deleting the woman walking behind your family 🙂