I get a lot of requests for my homemade whole wheat bread recipe. It’s really easy to make homemade bread in a Kitchen Aid Mixer, or you can always make it by hand. (If your mixer can only handle two loaves, you can easily halve this sandwich bread recipe.)
Assemble Ingredients
6 cups whole wheat flour
2/3 cup honey
1/2 cup coconut oil or butter, melted
2 tablespoon salt
3 tablespoons active dry yeast
4-1/2 cups very warm water (110°F to 120°F)
2 cups white flour
4 to 5 cups all-purpose flour
Butter or margarine, melted, if desired

Combine the Ingredients
Start your bread by combining the coconut oil, honey and 4-1/2 cups water in a small saucepan. Heat over the lowest heat just until the oil is melted. You do NOT want this to get too hot or it will kill the yeast. Ideally you want it to be between 110 and 120 degrees. (Sometimes I just heat the coconut oil and add the honey and water separately.)

While that is heating, place the whole wheat flour, yeast and salt in your mixer bowl. With the paddle attachment, mix about 15 seconds on Stir.

Continuing on Stir, add warm water mixture to flour mixture. Mix about a minute.

At this point I usually need to scrape the sides of the bowl.

Switch to the dough hook. Add the spelt and stir on Speed 2.

Then add the all-purpose flour, 1/2 cup at a time, mixing well between each addition. Mix about 2 minutes, or until dough starts to clean sides of bowl, adding flour as necessary. This is getting close.

Then knead the dough on Speed 2 for another 2 minutes, continuing to add a couple tablespoons of flour to get it to the right consistency. It should not be sticky so that it sticks to your hands, but you don’t want to get it dry to the point that it’s coming apart.
When it’s ready, it won’t be sticky. It will feel smooth and elastic.
At this point, dump the bread dough out onto a plate and grease the inside of the mixing bowl, all the way to the top.

Return the dough to the bowl, and turn over so that it is buttered on all sides.

Then cover it with a clean towel and place it in a warm place to rise. Usually the top of the oven works just fine, but on really cold days, I heat the oven to 120 degrees, turn it off, and then put the bread in the oven to rise.

After about an hour, it should be doubled in size.

Dump the risen bread dough out onto a large cloth or rolling mat.

Punch it down, and then divide it into four equal sized lumps of dough.

Take one and roll it out, about like this, and pretend that my camera was focusing on the dough instead of the rolling pin. Anyone know a photographer for hire?

Then roll it up tightly, like so.

And pinch the loose ends into the dough.

Then roll him over so the seam is on the bottom and fold the ends under, like so.

And place him in a buttered bread pan. I love my cast iron bread pans.

Then, wash, rinse, repeat, until all four loaves of whole wheat bread are in loaf pans, ready to rise.
Put the loaves to rise in a warm spot, covered with a clean towel, for about 45 minutes or so.

When the bread looks about right, preheat the oven to 350 degrees.

Pop ’em in the oven, and set your timer for 30 minutes. Of course ovens vary, but this works out perfectly for me. The bread is done when you tap it and it sounds hollow.

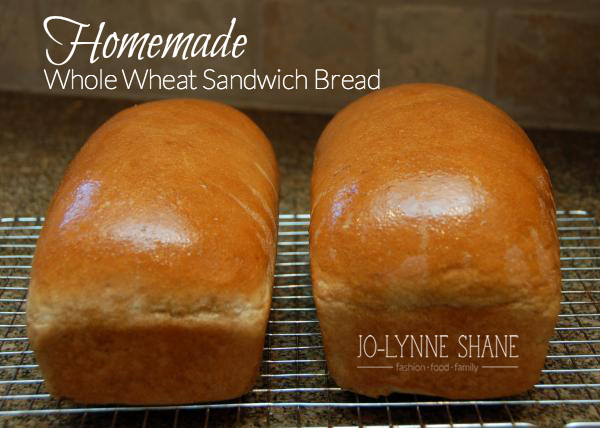
Immediately turn the loaves of bread out onto a rack to cool. I always slather butter on top of my bread because that’s what my mama always did. And because I’m a firm believer that you can never have too much butter.

Now tell me, doesn’t this bread look utterly divine?

Someone certainly agrees.

Here are the directions for your printing convenience:
- 6 cups whole wheat flour
- 2/3 cup honey
- 1/2 cup coconut oil or butter, melted
- 2 tablespoon salt
- 3 tablespoons active dry yeast
- 4-1/2 cups water
- 2 cups Spelt or white flour
- 4 to 6 cups all-purpose flour
- Butter or margarine, melted, if desired
- Combine coconut oil, honey and 4-1/2 cups water in a small saucepan. Heat over low heat JUST until the oil is melted. It should be about 120 degrees so as to not kill the yeast.
- Place whole wheat flour, yeast and salt in a large mixing bowl. With the paddle attachment, mix about 15 seconds on Stir. (This is the [mixer|https://www.amazon.com/mn/search/?_encoding=UTF8&tag=musofahou-20&linkCode=ur2&camp=1789&creative=390957&field-keywords=kitchenaid%20stand%20mixer&url=search-alias%3Dappliances&sprefix=kitchen%20aid%20stand%20mixer%2Cgarden%2C126] I have. It will do 4 loaves at once, but I often end up kneading the last few minutes by hand.)
- Continuing on Stir, add warm water mixture to flour mixture. Mix about a minute.
- Then with the dough hook in place, add the spelt and all-purpose flour, 1/2 cup at a time, mixing well between each addition.
- Mix about 2 minutes, or until dough starts to clean sides of bowl, adding flour as necessary.
- Knead on Speed 2 about 2 minutes longer.
- Place dough in greased bowl, and turn greased side up.
- Cover and let rise in warm place 40 to 60 minutes or until double. Dough is ready if indentation remains when touched.
- Form your loaves and place them in buttered loaf pans to rise for about an hour. (I love my [cast iron loaf pans|https://www.amazon.com/gp/product/B000PZZ0SW/ref=as_li_ss_tl?ie=UTF8&tag=musofahou-20&linkCode=as2&camp=1789&creative=390957&creativeASIN=B000PZZ0SW].)
- When they look the right size, bake for 30 minutes in a preheated 350-degree oven.
- Remove immediately to a cooking rack, brush tops with butter, and try to wait a few hours before cutting into one.
- Serve warm or room temperature.
- Freeze extra loaves and defrost as needed.
Want more delicious tried-and-true recipes?? Sign up for my email newsletter or visit my other recipe posts!


156 Responses
That is some yummy looking bread! I am going to try it this week. I have been searching for a homemade bread recipe that will work for sandwiches. (I realize any bread will work for sandwiches, lol, but I am trying to transition my kids over from store bought bread and they are hard to please!) Thanks!
Now I have to try this…by hand. Usually our bread goes into the bread machine but this looks too yummy to pass up!
This looks so good, I’m weeping. I’m bookmarking to use in the future!
Fantastic!!! Thankyou for sharing this recipe! CANNOT wait to try it!
hugs.. Amy
Oh, you are right, that bread looks utterly divine. Now, I just need to figure out how to manage my time so I can get that done! Thanks for the step by step and pictures. I want to try this out soon.
I’m so glad you shared this recipe. I meant to ask you for it last time we were together. Question: What kind of bread pans are those? I love them.
I’d love to try the recipe. We have a small family (one toddler) so I like that you can freeze the dough. How do you thaw the frozen dough and once thawed, do I roll out and go from this step? How long can the dough be frozen and still taste good?
Thanks a bunch!
Oh my! I’ve never seen such perfect bread. Congratulations!
I have to tell you that you’ve inspired me. I have made honey whole wheat bread about 4 times now, and my family just loves it. I’ll try your recipe next time, though, because it looks delish!
Looks delicious!!
My 11yo DS just drooled over your photos and said “you need to make some bread”.
I told him he could help…but then I remembered one time he did & put way too much salt in, so we affectionately dubbed his the Salt Lick Bread.
I think I’ll make some while he is at school 😉
Debbi, I set it out on the counter to defrost. I remove the tin foil and put a towel over it. It’s best to set it out the night before. I just watch it till it looks like it’s risen to the right height, and then I pop it in the oven and bake. 🙂
I would think it could be frozen for several weeks and still be fine.
Oh yay!! I was stuck (in a good way) reading through your “ask the housewife” series this afternoon & was on a mission to find one of your bread recipes!! I really enjoyed reading everything you’ve done & are doing regarding eating. It’s been important to me recently, but not enough to make the changes. I’m trying to take steps this year … all your info will help!!!
I’m REALLY looking forward to trying this!! If not this week, then definitely next week. I’ve been wanting to try homemade sandwich bread for a while now, and your recipe looks perfect.
I was just thinking this week that I need to find a new, better whole wheat bread recipe. This one sounds perfect.
Incidentally, how do you know how many loaves of bread your mixer can churn out? I’m wondering how many I can do at once.
Oooh, thanks for the recipe, can’t wait to try it out it looks very delish. Oh, and I love your range top, sweet!
Thanks for sharing your recipe! I made sandwich bread for the first time this weekend using the white bread recipe in the kichen aid mixer cookbook. Of course I swapped out some of the white flour for wheat and sugar for honey. It was so easy and so delicious. I can’t wait to try yours this weekend!
Those look DELICIOUS! I am totally making that. 🙂 Thanks for the recipe idea!
( I love my kitchen aid mixer… my new toy!)
This bread looks wonderful! What betty crocker cookbook? I have two I think. And I don’t know WHY I never thought to just grease the mixer bowl and let it rise in that!
My mom tried to get me a wooden bowl (to use just for bread) for me to rise my bread in…. not sure it’s the same thing (she got me a big salad bowl)
and yes, there is NO SUCH THING as TOO much butter!
Sure looks delish!
You’re my hero! 🙂 Seeing you tackle bread makes me think I can actually do it one day!
Nell
Oooh cast iron bread pans- so nice! (I want!!!) Do you know what size your mixer bowl is? I have a standard kitchen aid & looking at Amazon it looks like your mixer might be a 5 or 6 quart & mine a 4 1/2 quart. I want to adjust the recipe so it doesn’t overflow/overwhelm my mixer. Thanks for sharing- hope it turns out as good in my glass & metal pans!
Lisa, mine is a 6-quart. My old one was a 4.5 quart, and it handled half this recipe (2 loaves) quite nicely. Hope that helps!
This bread looks perfect. I’m trying this today. I hope mine looks this good!!
Thanks for posting this, Jo-Lynne. I’ve made your bread before, but it really helps having the pictures and seeing your little “tweaks.” I just made two loaves this morning with the updated instructions and they turned out beautifully! 🙂
Have you tried soaking and drying the grain first, yet? That’s the part that scares me. I’ve just been buying whole wheat sourdough from Trader Joe’s–which, obvs, uses real ingredients and no “other stuff.” But I’m about to move to someplace where there’s no health food stores and I’ll be learning the definition of real food, *really* fast.
Made your bread and it turned out fabulous. Made 3 loaves and a pan of rolls. Next time I will half it. My mixer was moaning and groaning by the end. LOL
I made some today and considered making rolls out of one. Next time I will. Glad you enjoyed it! 🙂
This bread recipe looks divine! Can’t wait to try it out…but I will have to do mine in portions as all I have are my two hands or my bread machine for mixing….one of these days I will get a Kitchen Aid….just can’t justify it yet. Probably won’t happen until retirement.
Do you always roll out the dough flat then fold it up as shown in the photos or is this specific to this recipe? Is there a special reason you do it this way? Looks interesting…would love to hear your thoughts…
Wanda, that is the traditional way to make a loaf of bread; I’ve seen it in many books and recipes. It really does make a pretty loaf. But I used to just squish it into a bread pan, and it worked okay. Just didn’t look as pretty. 🙂
And if you do the recipe in half and use your two hands, you will get a good work out AND have a couple yummy loaves of bread! 🙂
You instructions are so easy and the bread looks perfect! I’m saving this and buying me some bread pans!!
Question, do you think you have to have a stand mixer to make this? I would like to try it, but I don’t have one.
Hey Jennifer. No, not at all. You can do it by hand and knead it 5-10 minutes till “smooth and elastic” like a traditional bread recipe. let me know how it turns out!
I tried this last night on a whim. I ended up using a lot of spelt flour because it was what I had on hand. It turned out delicious (and I’m not lucky enough to have a device as beautiful as the KitchenAid stand mixer. *sigh*), and I even cut the recipe in half just because I didn’t have enough of all the ingredients on hand to make four loaves. Thanks for the recipe! 🙂
i made this last night;if my fiance hadn’t already proposed, i think the first taste of this bread might’ve sealed the deal! He could not stop raving about it. Now that i’ve read the comments, i’m anxious to try rolls!
i only got to soak the mixture for about 3 hours, but it was still really, really good! Where did you find your cast iron pans?
Do you think half of the recipe would work in a bread machine??? Looks soooo good!
Anna, I’m not sure, I don’t have a bread machine. Let us know if it works!
Hi, Jo-Lynne. I’m trying your recipe, non-soaked, cut in half, and the flavor is great, however, it is taking FOREVER to bake. (I put one loaf in the freezer and am baking the other) I put one loaf in at 350, in a glass bread pan and it’s been in there for 90 minutes! This is my first time making bread without someone else around who knows what they’re doing. Am I doing something wrong? I know oven temps vary, and I’m thinking that’s what it is. I don’t mind baking it for an hour and a half, as long as I know I’m doing everything right. What are your thoughts?
Clarify: I guess I should tell you that I’ve had it in the oven for so long because the middle is doughy. I cut it open after 30 minutes to see if it was done and it wasn’t. So I stuck it back in there and it’s still going….
Thanks
Heather
That is so odd. I’ve NEVER had that problem. No, that is way too long in the oven. Are you sure you have the right amount of ingredients? I’m baffled.
Oh my. I just ate my first slice. This is delicious. Thank you for the recipe! I’ve never made bread before and thanks to your clear instructions, it turned out perfect!!
Gulp. I just saw you updated this. I have been putting off doing a soaked recipe, but I am feeling the need to cave to the peer pressure. Bwhaahahahahahah
Do you use spelt flour? Where do you purchase yours from? (Also do you grind your own grain?). Lord have mercy this is a lot of mental power.
How do you cook the loaves that you freeze before baking? Do you thaw them on the counter?
Yes, I did. Nowadays, I just cook them all and freeze 3 cooked loaves and take them out as needed.
This looks so yummy and perfect. SAVING 🙂
Thank you for this recipe. I would like to try baking all of our bread instead of buying the mass produced chemical laden stuff from the store. I try to stay away from dairy, so do you know if substituting homemade rice milk or even coconut milk kefir for the buttermilk would work?
I still make this every week – 4 loaves get us through the week. It is SO good.
As for the milk, I”m not sure, but I would think rice milk would be fine.
I am trying your homemade whole wheat sandwich bread recipe for the first time. I’m wondering if I need to refrigerate the dough during the 7 hour soak or do I leave it on the counter?
Leave it out. 🙂
I tried your recipe and it turned out beautifully 🙂 thank you!
Hi Jo-Lynne,
I really appreciate what you’re doing here! The pictures and your sense of humor are great 🙂 I’ve just begun baking bread and I finally got a loaf of whole wheat to rise high enough to actually use, but it was stiff and broke easily. I hate to say this, but I’m looking for a recipe that is “elastic” like the ones in grocery stores. Does this recipe have that quality? Thanks so much!!
Darcie, you can definitely find breads that are softer than others, but honestly, the goal is NOT to be like grocery store bread, lol. Trust me, once your family gets used to REAL bread, they won’t want the spongy grocery store stuff. My kids balk every time I run out of homemade and suggest grabbing a loaf from the store to tide us over till I have time to make more.
But yeah, some are softer than others, and it takes a LOT of experimentation. I tried several recipes before I found this. It also takes some practice – learning how long to knead, rise, etc.
I still don’t have it down to a science. Sometimes it is dry and crumbly and sometimes it is fantastic. I can’t eat it, but I can tell when I cut it if I did it right or not. Someday I hope to have it so that I make it perfect every time! 🙂
I was wondering about a couple things. 1.) Do you mill your wheat or do you buy store bought. 2.) How do you soak your grains? 3.) What kind of coconut oil do you buy?
Your bread pictures look so good. I’m looking forward to trying your recipe.
Hey Melanie.
1) I do NOT mill my own wheat. Have mercy. LOL. I would love to, but sadly no. I buy organic whole wheat flour from my local whole foods mart. Or Bobs Red Mill brand.
2) I explain the soaking process in this post – combine whole wheat flour and salt and add it to the coconut oil/water/honey mixture and let it set overnight. Then add the rest and proceed.
3) I like to buy Nutiva. https://astore.amazon.com/musofahou-20/detail/B001EO5Q64
Hope that helps!
Thanks so much, Jo-Lynne! We just started milling our wheat. Really, it’s not a difficult thing to do. I have a Nutrimill (it’s an electric grain mill), and I buy grain from Breadbeckers.com. We have a local co-op.
Jolyn – why do you only soak the whole wheat flour and not the white too? Just a question I had while making your bread for the how many times – I don’t know!
A good question. From what I understand, white flour doesn’t have phytates, which is what you’re trying to break down or pre-digest when soaking the grain.
https://www.kitchenstewardship.com/2010/02/18/exploring-soaking-grains-what-are-phytates-and-phytic-acid/
How does it affect the recipe if I substitute the spelt with oat flour? I also have bread flour. What is that and can I use it in this recipe?
Hi Theresa. I’m kind of a “buy the book” sort of cook and I don’t experiment a lot. I’m not sure how oat flour would translate and I’m pretty sure you have to make some modifications when you use bread flour.
I just googled it, and it seems like you can use them interchangeably. You may try bread flour in this recipe – it might make it better. You wouldn’t want to use bread flour instead of all purpose in cake, but in bread it should be good.
Wondeful bread recipe and I am happy to found your blog. Just one question you mentione that we could freeze the dough. When I want to use it for later baking what should I do? Please do reply. Thanks in advance
You can freeze it and then the day you want to eat it, set it out and let it thaw. When it’s thawed, it will start to rise, and when it looks right, you can cook it! 🙂 It’s kind of hard to time it so you have to be around to watch it. I prefer to cook it all and freeze the cooked loaves to defrost as needed. It’s easier, I think. But both methods work!
Hi Jo-Lynne,
I just made your bread last night and it was delicious!! I didn’t have any white flour so I used white whole wheat instead of the white. My question is…since it came out so good this way and I’d prefer not to use white four…is there a way that I can soak all or most of the wheat flours or do I have to wait and introduce some of it dry with the yeast? Thank you!
Hi Kara. I’m not really sure. (True confessions… I don’t soak mine anymore. It’s just another step that I can’t seem to make time for.) If you experiment and find a good solution, can you let me know?
Hi,
I have recently started making my own bread and you are right, there is no comparison! I was wondering if you could tell me how you keep the bread loaves after slicing? Do you have a breadkeeper? If so, is there one you recommend…all I have found are plastic ones. I was curious what you did. Thank you!
Isn’t homemade bread divine!?? I keep them in tin foil, nothing fancy. I know aluminum is bad for us, and I hate to use it but I also don’t like using a lot of plastics. I’d love to have a better solution.
I just discovered your recipe for sandwich bread on Pinterest. I’ve always been to scared to make bread without using my bread maker. Now that I have found your tutorial I will be able to make several loaves at once, with confidence. Thanks for the great recipe, step-by-step tutorial, and pictures!
Two questions about this recipe…can you do the initial steps in a bread machine? If so…what steps are altered?
Also, do you happen to know serving size and calories for each loaf?
I can answer the first question if you tell me which recipe if you are asking about the soaked grains recipe. I have soaked the grains and used my bread maker but I had to adjust the quantity to fit what my maker would hold (my fits 2 loaves or 2#). I also soaked the grains overnight and then threw it into the maker in the morning for the first rise. I took it out for the 2nd rise (because I don’t like house bread tastes that bakes in a bread machine).
I’m only referring to the un-soaked grains recipe.
Gotchya! Then all you do is keep your wet ingredients on the bottom, like you normally do and after you add your flour you make a little hole (it’s called nesting) into the flour and add the yeast there, that way the yeast doesn’t get wet before it should.
This recipe looks like it would make 4 LARGE loaves of bread, so I would start out by quartering the recipe if you have a 1 or a 2 loaf maker and see what happens.
I have a white bread recipe that is fool-proof in a maker if you are leery. You can email me – [email protected] — I don’t want to take a away from any of JL’s work, but I know how much I LOVE my bread machine and how sometimes my family gets sick and tired of soaked grain bread. 🙂
Hi Amy. I don’t have a bread maker, so I’m thankful that Darla stepped in to help us out.
Sorry, but no I do not have any calorie counts or anything.
The bread looks delicious. I will try make it. I`m wonderiung… Can I use for example canola oil instead of coconut oil? Will be okay to use different?
Hi Olga. You can but I don’t recommend using canola oils. They aren’t as healthy as coconut oil. You could also use melted butter.
Here’s a post on oils: https://jolynneshane.com/2009/10/more-on-fats-particularly-coconut-oil-and-lard.html
I love this recipe and do plan to make this. Thanks for the post. I just wanted to add that I really love your bread pans!!! I would love to know what kind they are or where you got them. They are adorable. They look like really old ones.
I do love my bread pans! They are not old, not are they expensive.
https://www.amazon.com/gp/product/B000PZZ0SW/ref=as_li_qf_sp_asin_tl?ie=UTF8&tag=musofahou-20&linkCode=as2&camp=1789&creative=9325&creativeASIN=B000PZZ0SW
That is my affiliate link, so I do earn a small commission on sales. But I have four of these pans and they are SO AWESOME for bread. I use them every week.
I read about this on once a month mom and I think tomorrow or Monday I am going to make my first batch (going to half the recipe) I have one metal loaf pan and one glass pan…hope these work and if we love it I will definitely be buying the cast iron pans! Thanks for the encouragement and pictures…I didn’t see anything about soaking the wheat, should I do this? and if so, how do I do this as I still can’t find where it says to do this. I am very nervous about this but I think the switch is awesome!
Hi Kristen. I don’t soak my wheat, although I know I should. Kelly the Kitchen Kop has a soaked whole wheat sandwich bread recipe that you can check out.
I tried this recipe this morning. My first rise did great but second rose s little but loaves were flat on top. I didn’t have spelt flour so just used all purpose. Was that the problem?
On the recipe it calls for 4 &1/2 cups warm water and the 1/2 cup warm water. When do you add the 1/2 cup?
Robin, I don’t see an additional 1/2 cup. Am I missing something? It is just 4-1/2. I think in a previous recipe, there was a separate 1/2 cup for proofing the yeast, so if you see an extra 1/2 in there somewhere, you can omit it.
Has anyone tried modifying this recipe into a cinnamon bread, was thinking of doing it tomorrow. I’ve made this recipe several times now and it always comes out awesome. Thanks!
I actually did. It was good, but I really prefer cinnamon bread with more white flour. Sad but true! 🙂
okay…i am brand new at bread making…today was only my second time. we are trying to replace store bought bread and mine seemed to come out more dense than i wanted. i halved the recipe and used all all purpose flour (i didn’t have spelt). i let it rise 1.5 hours, it didn’t look doubled. should i have let it rise longer. yours looks so much “lighter” than mine. any suggestions. thank you so much for any help.
Hi Jan. It is really hard to say. Bread comes out differently at different altitudes, and it varies depending on the humidity. If it didn’t look doubled, it probably needed a longer rise, or you may have had weak yeast? WAs it old? B/c it should at least double in that amount of time. Let me know if you try it again.
Dear Jo-Lynne,
I think I flattened mine too much rolling it out. 2 did not rise very well after I flattened them and rolled them up, the other 2 I was a little more gentle but they still didn’t double. they’re all in the oven now, we’ll see!
How did it turn out??
Did I miss something on this??? I don’t see anything about soaking the flour but there are all kinds of comments about it.
so I’m kind of confused.
I have made it (unsoaked) 2-3 times now and it’s an amazing recipe. But DO NOT try to do the whole recipe in a regular kitchenaid mixer (non professional size one) it will overflow you bowl and climb up into your motor…
Hi Leah. Yeah, at one point I had a soaked version on here, but the last couple times I tried to make it, it didn’t work out for me, so I just took it down, plus it seemed confusing to have both in one post. I should try to recreate it sometime. I have it written down somewhere, I think.
Thank you so much for this recipe. I made two loaves today using my standard size kitchen aid. My loaves didn’t turn out as pretty as your but they tasted great. I am so excited. This will definitely be a weekly recipe in our house. We eat tons of sandwiches and toast in our house so I am very excited about being able to provide a healthier option for my family. It was so easy too. Can’t wait to perfect my technique so my loaves look as good as yours!
You call for spelt or white flour, then additional all purpose flour. Are white flour and all purpose the same? So if you aren’t using spelt you’d be using a total of 6-7 cups all purpose? Thanks!
Yes, that is correct. On all counts. Sorry, I shouldn’t have used “all purpose” and “white flour” interchangeably.
Thank you so much for posting this recipe. I have made this at least recipe 4 0r 5 times now. Friends I have shared the bread with really like it. My husband says it is the best recipe I have tried by far. It is WONDERFUL!! I really like your cast iron loaf pans :). Thanks again for sharing.
Karina
That is SO nice to hear! Glad you are enjoying it.
Trying your recipe right now. Loaves are made and rising. Can’t wait to bake them! I’m a complete novice bread maker, so we’ll see… 🙂
How did it go?
I made your sandwich bread yesterday and this morning one loaf disappeared. I have three daughters who gobbled it down saying it was better then store bought and gave some to friends and their children. All of them are asking for the recipe. I have tried to make bread three times and this is by far the favorite. It will be our weekly bread. Thank you so much for helping me to get store bought bread out of my house!
That is awesome! So glad to hear it.
I’m making this today…Can’t wait to see how it tastes. Can’t wait for my kitchen to smell amazing. I didn’t have spelt flour so just used all white flour. I also did half butter and half coconut oil because I wanted to see how the coconut oil affected the flavor. I do not like coconut so didn’t want it to be too strong. I also halved the recipe because my mixer is smaller. I’ll let you know how it turns out. I will probably blog about my adventure with a new recipe and will certainly link back to your blog for the recipe.
Sounds great! Can’t wait to hear how you like it!
The bread turned out so so good! Thank you for sharing it and I have found a new blog to enjoy.
Here’s the link to my post about it.
https://troyerslovinglife.blogspot.com/2012/10/new-bread-recipe.html
Great recipe! This is probably a really basic question, but after you cut into the loaf, what is the best way to store it until you finish eating it? Should I wrap it in Saran wrap and keep it out at room temperature or put it in the refrigerator?
I don’t know if it’s best or not, but I always wrap it in tin foil and keep it on the counter. Ours is usually gone in 2 days, so it doesn’t have time to get dry but if it does, we just use it for toast. 🙂
Hi there Jo-Lynne,
I made the bread for Thanksgiving and it was delicious! I have the smaller Kitchenaid so I need to half the recipe, would you use 2 envelopes of yeast or buy the jar and use 1-1/2 Ts?
All the best,
Catherine
I’ve only ever used the jar but I’m sure you can eyeball it from the packets if that is what you have on hand. Glad you liked it!
Jo-Lynn, I’ve been using this recipe for a long time now. It always turns out GREAT. However, I must 1/2 the recipe because I only have a Classic KitchenAid mixer. A problem I keep experiencing though, is I always end up needing nearly 4 cups of all-purpose flour for the dough to get to the proper consistency. I’ve even cut back from 2 1/4 cups of water to 2 cups. By the time it’s ready to be taken from the mixer, it’s always over-flowing my mixer to the point it gets up above the dough hook & into the spring.
I go strictly by your recipe, starting out with 3 cups of whole wheat flour, 1 1/2 Tbsp of yeast, 1 Tbsp salt, mix & add the 1/3 cup honey, 1/4 cup coconut oil mixture, then adding the 1 cup of Spelt flour. The recipe then calls for 2 to 3 cups of all-purpose flour, but why do I always need to add nearly 4 cups? Any idea what I can do so I don’t need so much all-purpose flour? I wouldn’t mind but I hate when it ends up being too much for my 4 1/2 quart mixer.
Maybe next time I’ll try cutting back to 1 & 3/4 cups of water? What do you think?
Any suggestions would be greatly appreciated. I have 2 loafs rising at the moment. 🙂
Thanks
Hi Gary, I really don’t know. I usually halve the recipe, myself, b/c even with my big mixer, it couldn’t handle the 4 loaves and would always cut off. So I do two, and halving it seems to work for me. I don’t think I use more than 3 cups of all purpose flour. Maybe someone else will have a suggestion?
Thanks for the quick reply. I’ll let you know how the next batch turns out and If you wouldn’t mind, please double check how much all-purpose flour you use exactly, on your next batch for me. Thanks
My husband is a biology teacher, and as an experiment with his class, they attempted to grow bread mold. They took slices from a three week old store-bought loaf and rubbed them on the classroom floor before sealing them in petri dishes. My husband brought the dishes home and we spent two weeks attempting to get those samples to grow mold. As I type this, there is six week old bread sitting in those dishes on our kitchen counter, mold free.
That’s why I decided to make our own bread. I’ve made this recipe a few times now, and we love it! I love that it’s a simple, frugal switch, and that I know exactly what my family is eating. I half the recipe and I use only white whole wheat flour. Thanks for a delicious recipe!
that is truly frightening! LOL. glad you’re enjoying my bread. 🙂
I’ve made plenty of homemade “special occasion” bread, but I’m going to try to start making a batch 1-2 x month for my Husband & mine’s lunches and this recipe looks like just the one to try first! Thanks for all the beautiful step by step pictures too!
I have been using your recipe for several months now and love it. This is my ‘go to’ sandwich bread recipe. I have a tilt head KitchenAid stand mixer. I’ve been halving the recipe and making 2 loaves.
Can the 4-1/2 QT or 5 QT (I’m not sure which one I have) handle the full recipe? I just bought more bread pans so I can bake 4 loaves at a time.
This takes no time at all to make. It rises much faster than any other recipe I have tried before. I love the easy method! Thanks for sharing. I slash the top with a razor blade just before baking and it looks so professional. My family absolutely loves it. Thanks for helping make wonderful memories!
So glad you’re enjoying it! I have a 6qt mixer, and I bought it just for this, so I could make 4 loaves. It holds the dough but the motor can’t handle it. I have gone back to making 2 at a time. 🙂
Wow, that was a quick response! Thanks for letting me know. Okay, I’ll stick with the 2 at a time recommendation. My hubby wants me to bake a bunch for our neighbors and family, so I’ll just keep the oven on and do a couple batches back to back. I like to knead the last little bit of flour in by hand anyway so I can get the texture of the bread perfect. I’m old school that way 🙂
Oh yeah, and this is THE recipe that made me to donate my bread maker that kept making ‘caved-in tops’ loaves.
My hubby makes his sandwiches for lunch with this bread and always rants and raves about it showing it off to everyone he can! And it’s sooooo much healthier than store bought bread! Have a great w/end!
Yes, it is MUCH better when kneaded by hand at the end. I am lazy tho and usually skip that step. I want to try making the slashes on top next time!
Yes, just wet the razor blade with water and make about a 1/4″ deep cut lengthwise. A serrated knife will work on denser breads, but this one is so light and delicate, a new razor blade works much better. I’d gladly share a photo of my finished product for all your hard work and effort, but I don’t see a way to post it here.
I wonder if Facebook will allow you to post it on my page? https://www.facebook.com/MusingsofaHousewife
Thanks so much for sharing your recipe. I just made two loaves and they were fantastic. I will add this to my goto bread recipe. The whole family loved it!
Love the recipe! Thanks for posting! I halved the recipe & made it today. I was so excited to finally find a recipe that worked for me. I was rising beautifully & when it was time to bake it it fell flat when I moved it from the counter to the oven. Any ideas why or suggestions on how to stop that from happening?? Thanks!
Oh no! I’ve never had that happen! I’m not sure what it could be. Maybe a big air bubble? That’s all I can guess. I’m so sorry…..
In my search for the perfect wheat bread, I stumbled upon your site. I usually don’t comment, but this bread was fabulous! It is now my favorite recipe. Thanks for sharing!
I’m so glad!!!
Hello!
Where do you store the bread? Just wondering since it has butter on top. Will it store ok on counter or does it need to go in fridge? Or does it last that long? 🙂
Thanks!
Kellye
I just store it on the counter wrapped in foil. It doesn’t last long!
thank u!!!!!
Hello!
I’ve been making your bread for a couple of months now. No more store bought bread! But…I have a question. Can I make some hamburger buns or rolls with this?
Thanks!
Kellye
FYI – I made hamburger buns today! When I rolled out the dough after punching down…I got a wide mouth jar lid ring….cut out the circles and put on parchment paper on cookie sheets to rise. Then baked at 350 for 15 minutes or so until done1 They are great! Thanks!!!!!
Wow, I so wanna try that. Thanks for the tip!!
Love the recipe. All the others I’ve tried are heavy this is light love it
So great to hear!
Please help! I absolutely love this recipe and so does my family; however, my bread keeps ending up with air pockets in it so when I cut slices it’s never in a whole piece. All the holes seem to be at the top of the bread. I follow every step in the direction so what am I doing wrong?
Hm. I don’t know so I asked on my FB page! Hopefully someone will have advice.
https://www.facebook.com/MusingsofaHousewife/posts/590962724279913
We LOVE this bread! I’ve been making it a few months now and I am interested in soaking the flour. I’ve read a few of the comments of others soaking, but haven’t found how to do it. I gave it a try last night, but today I had to add more water to activate yeast and the other ingredients, it was wet. Then I had to add a few cups of flour. The end results were not as flavorful, still good but wondering if there is a technique to using soaked flour and making this amazing bread.
Have not made bread in 30 years – wonderful return to the practice … Easy recipie … Will taste tomorrow – in the oven now!
Okay, so I probably should have read all of the comments before I made the bread. Next time I will try halving the recipe, I think my 5qt KitchenAid could handle that much better. Our dough is currently rising right now (first time) and I’m still on the fence on whether this will be amazing OR a total disaster. If it’s the latter though, I definitely will try again another time. Hoping it will be good though!
How do you prevent air bubbles?
Hm, there could be a few reasons, and I’m getting rusty on my bread making since going GF. There is some good advice here: https://www.thefreshloaf.com/node/14540/how-best-avoid-large-air-bubbles-bread-baking
I saw you video on YouTube for this bread but the recipe on your site is different, on the video you proofed the yeast fur which is what I would expect but on your site you mix the yeast with the flour etc. Can you clarify?
Yes they are two different recipes. I like this one better.
Can you use all 100% whole wheat? If so are there any required changes to this recipe?
You can, it will just be more dense.
How did you get the slice that the little girl is eating so perfectly sliced? I have made homemade bread a few times and my slices never come out that perfect. It looks like the way commercial sliced bread looks like.
I just cut it! 🙂 But I do have a nice serrated bread knife. I don’t know…. practice, I guess? 🙂
This looks wonderful. I’m going to have to get some cast iron skillets. I really would like to start making my own bread. Pinned!
Thanks, Tricia! Enjoy! It is so good.
What size mixer are you using to make the 4 loaves?
I believe it’s a 6 quart.
Thanksgiving 2017, broke out the recipe for this wonderful bread today and voila! Perfect sandwich bread!
I have the 325W tilt head Kitchenaid and made the 4 loaves in a larger glass bowl I purchased separately. Throughout the mixing process, I stopped and scraped off the dough that had crept up the dough hook, it would be great if I could rig something to keep the dough below the disc at the top of the hook! As it is, I kept saying to myself ‘at least I’m not kneading the whole thing by hand!’
Thank you for the delicious recipe!
Glad you like it!
Thank you for the recipe. This came out wonderful and looked amazingly beautiful. My little taste tester also approved.
So glad to hear it!
Made a mistake and warmed the salt and yeast with the liquid! My father used to say “when all else fails, read the instructions!”
Waiting now to see whether it rises.
Oh no! I hope it works out.
Rose perfectly!
YAY! So glad!
I’ve made this a dozen times and everyone raves over it. One change though…when I first made it I didn’t have any spelt flour so I used almond flour instead. Now I’m afraid to try it any other way because it turns out so good. 🙂
So glad you’ve enjoyed it. We have a nut allergy in our house so that’s not an option for us – but good to know it works!
Can I use normal oil instead of coconut oil or butter?
SUre!